Collapse
Submit a Service Request
Contact Information for Technical Support
My Service Notifications
Integrating surveys with Web Chat for Service
Answer ID 12922 |
Last Review Date 12/12/2024
How do I add a post-chat survey to my Web Chat for Service (WCFS) widget?
Environment
Chat / Engagement Engine
Web Chat for Service 24.10 and above
Resolution
In order to offer post-chat surveys to customers via the Web Chat for Survey (WCFS) widget, the Post Conversation Message feature must be configured in the Web Chat component in the Engagement Engine editor. Below are complete steps to set up post-chat surveys for WCFS.
 You will first need to create a Website Link Survey in Oracle B2C Service and change its standard URL
1. Steps to create a survey to be used for Chat can be found in the Create a Website Link Survey section in the B2C Service Online User Guide
2. The URL of the B2C Survey will need to be changed with the Engagement ID to relate the results to the corresponding chat interaction, as follows:
a. Open the Website link survey and click Survey URL on the survey ribbon.
b. Paste/Copy the URL onto a text editor for examination
At this point the URL will have this format:
https://interface_name.custhelp.com/ci/documents/detail/5/survey_id/12/autorization_code
This is the generic URL for this survey and is broken down as follows:
/interface_name.custhelp.com is the B2C support interface (ie. acme.custhelp.com)
/ci/documents/detail is the location where the survey exists
/5 represents that this is a survey
/survey_id is the unique identifier for the survey being used and follows the “/5”
/12 represents there exists an authorization code
/authorization_code is a unique code for access to the survey
/ci/documents/detail is the location where the survey exists
/5 represents that this is a survey
/survey_id is the unique identifier for the survey being used and follows the “/5”
/12 represents there exists an authorization code
/authorization_code is a unique code for access to the survey
In order to associate the survey and the chat, a table and a primary id need to be associated to the survey. Add the following to the URL. Note: these are added within the URL and not at the end of the string
/6/223 – the 6 represents a table association, 223 represents the chat table.
/7/{ENGAGEMENT_ID} – the 7 represents a primary id association, while {ENGAGEMENT_ID} is the chat ID variable necessary to associate the survey and the chat engagement.
/7/{ENGAGEMENT_ID} – the 7 represents a primary id association, while {ENGAGEMENT_ID} is the chat ID variable necessary to associate the survey and the chat engagement.
When completed the finished URL should look like this:
https://interface_name.custhelp.com/ci/documents/detail/5/survey_id/6/223/7/{ENGAGEMENT_ID}/12/autorization_code.
c. Copy the finished URL to use in next step
 The relevant Web Chat component then needs to be edited in the Engagement Engine editor
1. Open the Engagement Engine editor > Settings > Web Chat > select the relevant WCFS component
2. Go to Feature Flags > Enable Post Conversation Message > make sure the box is checked

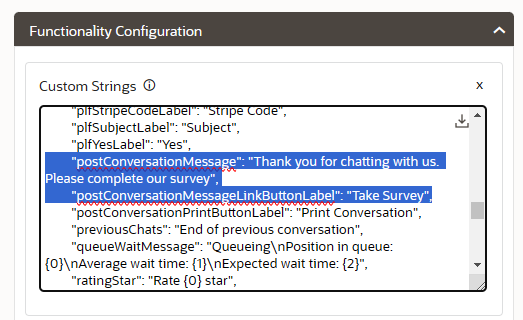
3. Go to Functionality Configuration > Custom Strings > Edit the "postConversationMessage" and "postConversationMessageLinkButtonLabel" strings to the text of your choosing. The standard values are already added for the purpose of using Chat Surveys.

4. Go to Functionality Configuration > Post Conversation Message Options
a. Select Type
choose link, if you want the user to click and open the survey in a new tab
choose iframe, if you want the survey to be displayed in an iframe in the WCFS widget
b. Set Url: Paste the relevant URL, built as mentioned in the steps above
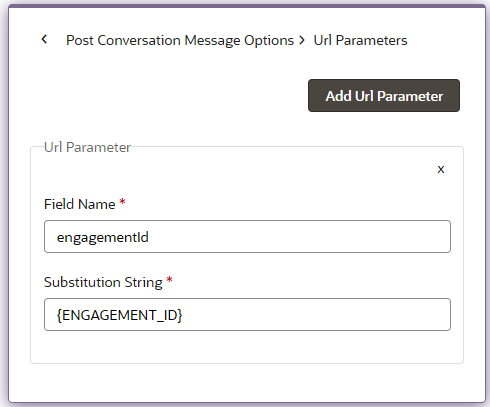
c. Set URL Parameters:
FieldName: engagementId
Substitution String: {ENGAGEMENT_ID}
Substitution String: {ENGAGEMENT_ID}

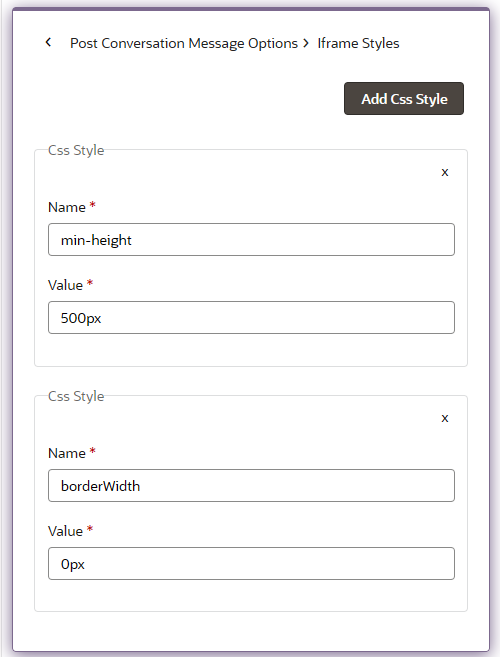
5. (Optional) If you have selected the iFrame type, you can add a CSS Style so the iFrame better suits your survey. Go to Post Conversation Message Options > iFrame Styles > Add Css Style
The following style can be added:
- Minimum height. Example:
- Name: min-height
- Value: 500px
- Border width. Example:
- Name: borderWidth
- Value: 0px

6. Save & Publish the Web Chat component